Service Manager
Archiving and Deleting Log Data from the Service Manager Databases
•About Archiving and Deleting Log Data from the Service Manager Databases
•About the Types of Log Data to Archive and Delete
•Archiving and Deleting Log Data from the Service Manager Databases
•Modifying the Database Archive and Delete Feature
About Archiving and Deleting Log Data from the Service Manager Databases
In Service Manager, if you do not delete the data in your databases, the data continues to grow. This can cause problems with storage for the databases, reduced performance as the application grows, database schema changes taking longer to apply, and the quality of the search results can diminish when old, and irrelevant, data is included. Additionally, larger databases required more database servers which can increase costs.
Logs contain valuable information about Service Manager and are invaluable aids to Ivanti Technical Support for diagnosing customer issues. Ivanti recommends that you keep all logs from the current release and the most recent past major release.
Prior to Service Manager Release 2015.1, we only supported backing up the databases for disaster recovery purposes.
You can configure the data to delete at the business object level. For each database delete, you can specify the following:
•The business objects to include in the archive.
•The schedule for the archive, per business object.
•If the archive is enabled or disabled, per business object.
•The part of the business object to archive.
•If you can preview the archive.
•When to back up or purge the archive.
About the Types of Log Data to Archive and Delete
The database archive and delete feature works with two types of data:
•Transactional data, which is a customer's data records, including incidents, changes, service requests, and so on.
•Non-transactional data, which is made up of logs. Currently, these are the database tables for logs:
•FRS_Application_Update_Notes: FRS Application Update Notes
•FRS_BaselineLog: Baseline Log
•Frs_data_integration_history: Integration History
•Frs_data_integration_log: Integration Log
•Frs_data_run_program_log: Run Program Log
•Frs_data_workflow_instance: Workflow Instance
•FRS_GlobalAuditLog: Global Audit Log
•
•frs_ops_change_log: Service Manager Development Package Change Log
•Frs_ops_gbu_pipeline_history: GBU Pipeline History
•Frs_ops_integration_queue: Integration Queue
•frs_ops_metadata_history: Metadata History
•Frs_ops_validation_results: Validation Results
•LDAPImportLog: LDAP Import Log
•Logs: Logs
•ScheduledJobHistory: Scheduled Job History
Archiving and Deleting Log Data from the Service Manager Databases
You can either use this feature as is to clean out non-transactional data or you can modify the feature to tailor it to your organization's needs. To modify the feature, see Modifying the Database Archive and Delete Feature. To use the feature as is, follow this process:
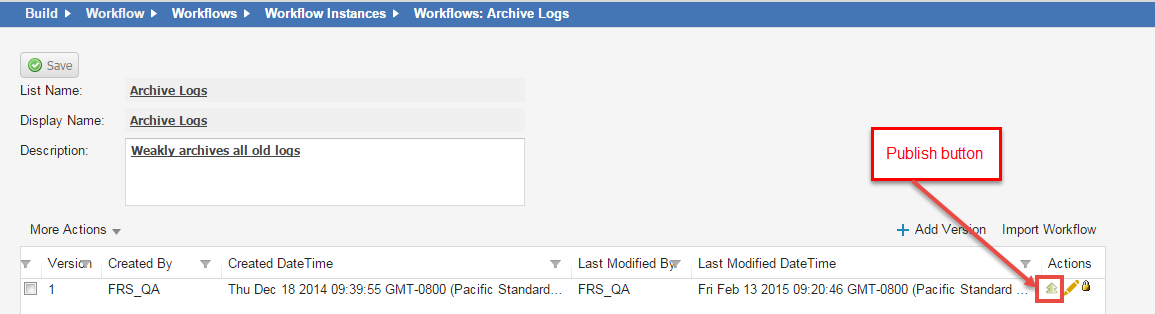
1.From the Configuration Console, click Build > Workflow > Workflows to open the Workflows workspace. The application displays the list of available workflows.
2.Under the Scheduled Entry header, click Archive Logs. The application displays the Workflows: Archive Logs page.
3.At the end of the line for the most recent workflow version, click the publish  icon to enable the workflow. The workflow line turns green.
4.At the confirmation message, click Yes. The application publishes the Archive Logs workflow and data either archives or deletes the data based on its parameters.
Easily Deleting Your Data
See About Workflows and Archive for Search Workflow Block for information about workflows.
Modifying the Database Archive and Delete Feature
You can modify the database archive and delete feature to suit the specific needs of your organization.
•Modifying the Age of the Data to Archive and Delete
•Modifying the Time and Frequency of the Database Archive and Delete Feature
•Modifying the Data to Archive and Delete
Modifying the Age of the Data to Archive and Delete
The application archives and deletes data of a certain age, as defined by the ArchiveAge global constant. You can edit the value of the ArchiveAge global constant so that the data to archive and delete is older or newer than the default value of 180 days.
Follow these steps to modify the age of the data to archive and delete.
1.From the Configuration Console, click Build > Global Constants to open the Global Constants workspace. The application displays the list of global constants.
2.Scroll to the global constant called ArchiveAge.
3.Double-click the value to edit it.
4.Change the value.
5.Click Save.
See Modifying a Global Constant for more information about using global constants.
Modifying the Time and Frequency of the Database Archive and Delete Feature
The database archive and delete feature runs on a schedule that is defined by a scheduled job called Archive Schedule. You can edit the Archive Schedule scheduled job so that the database archive and delete feature runs more or less frequently, or at a different time.
We recommend that you run the database archive and delete feature at a time when the application is not being heavily used, as archiving and deleting data could impact the performance of the application, especially the very first time. The amount of time to archive and delete the data depends on the size of the data to archive and delete, which depends on how frequently you run the feature and how big your application is.
For example, if you run the database archive and delete feature weekly, then you archive and delete a week's worth of data. But the first time that you archive and delete data, you will be archiving and deleting all of the application data so that will be significantly more data and take much longer.
The default scheduled job for the data archive and delete feature is to run on Saturday and Sunday starting at 12:00AM and ending any time before 11:45PM. Both times are local times.
Follow these steps to modify the frequency of the database archive and delete feature.
1.From the Configuration Console, click Monitor > Scheduled Jobs to open the Scheduled Jobs workspace. The application displays the list of scheduled jobs.
2.Double-click the Archive Schedule scheduled job to open the record.
3.Change the values as needed.
4.Click Save.
See About the Schedule Entry and Scheduled Jobs Workspaces for more information about using scheduled jobs.
Modifying the Data to Archive and Delete
The data to archive and delete is based on a saved search called Archive. You can create your own saved search or you can use the Archive saved search. For example, if you do not want to archive or delete all of the logs, but just a specific log, you can modify the saved search.
Follow these steps to modify the data to archive and delete by modifying the Archive saved search:
1.From the Service Manager Application, open the Logs workspace. The application displays the list of logs.
2.Click ALL to show the list of saved searches associated with logs.
3.At the bottom of the list, click All Saved Searches. The application displays the list of saved searches with additional information.
4.Highlight a saved search and click the edit icon  to view the search criteria.
5.To run the saved search, click Run Search. The application displays the list of logs that are part of this saved search.
Was this article useful?
Copyright © 2019, Ivanti. All rights reserved.